Sunday, October 21, 2012

Candy Corn???? Smell My Feet?

The girls and I decided to make a Halloween footprint project. Handprint and Footprint projects are their favorite because they get to get paint all over without getting into trouble.  We are going to paint their feet like Candy Corn for the project.

First we gathered together everything we would need.
     1 canvas frame
     Acrylic Paints - White, Yellow, Orange, Tan & Black.
     sponge brushes

We painted the canvas all in Tan and then waited for it to dry. Then we poured globs of White, Yellow & Orange paint onto a plate so we could work quickly with it. 


Paint the White onto the heel, Orange across the middle of the foot and then Yellow across the top part of the foot including the toes.  


Working as quickly as possible before the paints dry place the foot onto the canvas in the area where you want it to appear.  Reapply paints if making more than one footprint and repeat the process until you have the amount of Candy Corn footprints on your canvas that you want.


When canvas is completely dry then, using the Black paint you want to paint on the words TRICK OR TREAT SMELL MY FEET.  Then we painted the sides of the canvas black also. When project is completely dry then it is ready to hang on your wall.


This project was made for the girls' parents as a surprise!

Happy Halloween Everyone!!!

Sunday, April 29, 2012

Handprint Tree

This weekend's project was a very special one. We made this for the children's daddy for Father's Day because he will be leaving on a long trip and will not be home for Father's Day so we made this and will be giving it to him before he has to leave.

Sunday, April 22, 2012

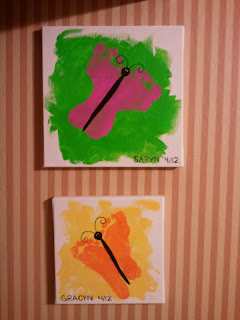
Butterfly Feet

This is our latest project.  It is for the girls' mother's birthday today.  They said it tickled when the paint was applied to their feet.  I used 2 different sized canvas because of the size of their feet.  Then we just used acrylic paints.  Each girl painted their own backgrounds.  I helped with painting the black body of the butterflies and adding their name and date to the bottom.

Monday, April 2, 2012

Backyard Birdfeeder

I have the joy of watching a 3 & 5 year old and the other day we saw this birdfeeder on Pinterest and they thought that was kinda cool.  And since they had just finished drinking juice from one of those gallon-sized containers we thought it would be a great idea.

Here is what we needed:
1 large plastic juice container.
medium sized rickrack
low temp glue gun & extra glue sticks
12"-14" dowel (about 1/4" thick)
exacto knife or carpet knife
birdseed

First we washed the plastic jug and removed the label.

Draw a 3" circle on the side of the jug about 2" from the bottom.  We carefully cut this out using our knife.  Now make a small-sized hole about 1/2" under the large circle.

Repeat this process for the other side of the jug.

Now you can insert the dowel through these small holes making sure they are even and not too long.  This is where the little birds can perch themselves while getting a snack.

Our jug had indentations in the plastic going around the jug so we thought that would be a good place to glue the rickrack since it was already a nice, straight line.  The girls chose the colors to alternate and I think they did a good job.  Using the glue gun we glued the strips of rickrack onto the jug.  We then used black rickrack to go around each 3" circle so the opening would be noticeable.

The top of the jug looked too bare so we added a few leather flowers that I had removed from sandals that had gotten ruined, and we glued those on also.

Now you are ready to add the birdseed and go hang it up.

The girls can't wait to take this home and hang it off their patio

Recycle & Repurpose - that's my motto.  But then I just can't thrown some things away.